In today’s digital world, AI avatars are changing the game. Whether you’re a content creator, an entrepreneur, or someone who loves experimenting with new technology, knowing how to create a talking AI avatar can give your videos, presentations, or projects a futuristic edge. Imagine having an AI-powered character that doesn’t just speak but also stands up, moves, and even walks—all while maintaining eye contact and natural gestures.
Sounds like something out of a sci-fi movie? Not anymore! In this step-by-step guide, I’ll show you how to create a fully animated, talking AI avatar from scratch. This isn’t just about making lips move—it’s about bringing your AI character to life with dynamic movements and professional-level video editing. So, let’s get started!
Why Create a Talking AI Avatar?
Before we dive into the technical stuff, let’s answer the big question: Why should you even create a talking AI avatar?
- Engagement: Viewers are more likely to pay attention when they see a lifelike character that speaks and moves naturally.
- Professional Appeal: An AI avatar can make your content stand out, giving it a polished, cutting-edge look.
- Cost-Effective: You don’t need actors, cameras, or fancy equipment. AI handles it all.
- Flexibility: Customize the avatar for different styles, emotions, and environments.
Step 1: Generating the AI Avatar Prompt Using ChatGPT
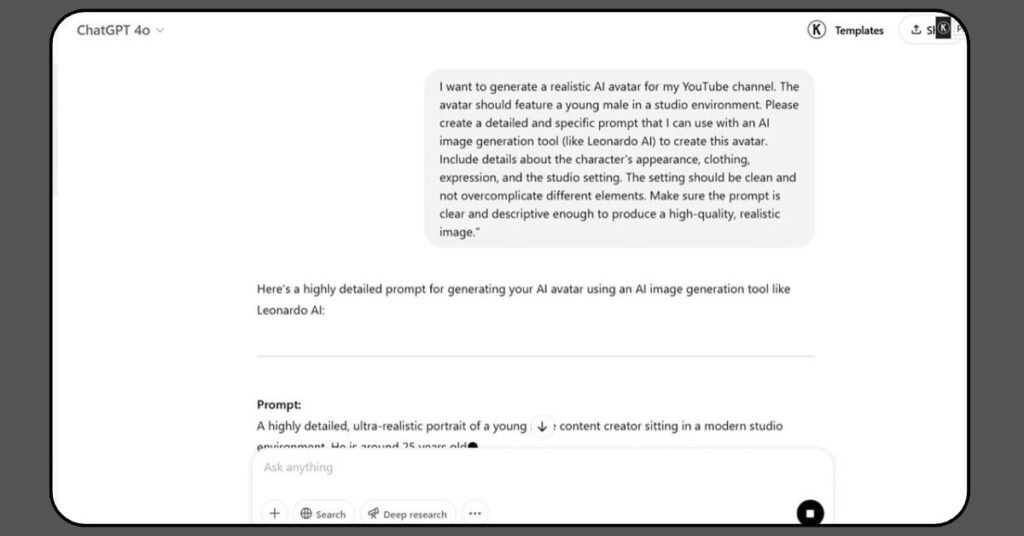
Creating an AI avatar starts with a well-crafted prompt. This is the blueprint for your avatar’s appearance and environment.
Here’s how to do it:
- Open ChatGPT (you’re here already—nice work!).
- Paste in a prompt like this:
“I want to generate a realistic AI avatar for my YouTube channel. The avatar should feature a young male in a studio environment. Please create a detailed and specific prompt that I can use with an AI image generation tool like Leonardo AI to create this avatar. Include details about the character’s appearance, clothing, expression, and the studio setting. The setting should be clean and not over-complicated.”
- Hit enter and let ChatGPT generate a highly detailed prompt.
This step ensures your AI avatar will be exactly how you envision it—whether it’s casual, formal, quirky, or professional.

Step 2: Creating Your AI Avatar in Leonardo AI
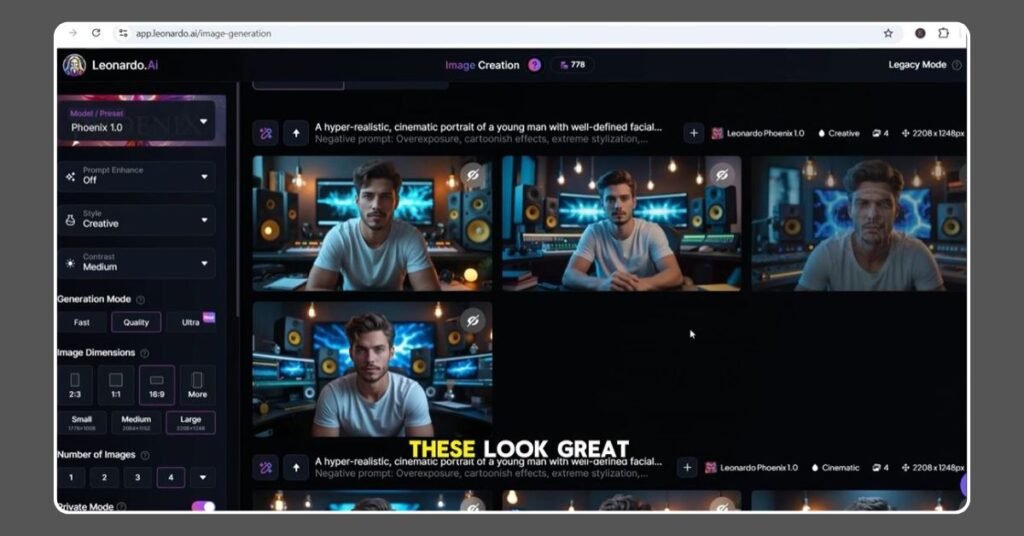
With your prompt ready, it’s time to generate the avatar image.
Follow these steps in Leonardo AI:
- Choose the model: Select Phoenix 1.0 for the best realism.
- Prompt enhancement: Set to Auto.
- Generation mode: Keep it Dynamic.
- Contrast: Set to Medium.
- Aspect ratio: Choose 16:9 (perfect for YouTube).
- Number of images: Generate 4 images for variety.
Once generated, pick the avatar image that looks the sharpest, has the best lighting, and has a clean background—this is key for animation clarity later on.

Step 3: Upscaling the Avatar Image for Crisp Quality
Before animating, make sure your avatar image is high resolution.
- Use Leonardo AI’s Image Upscaler.
- Select Realistic Style and Ultra Upscale Mode.
- Hit Upscale and wait a few seconds.
Why upscale? Because a sharp, detailed image makes a massive difference when animating your avatar. You’ll notice cleaner edges, better lighting, and more lifelike textures—especially in hair, skin, and clothing.
Step 4: Animating Your Avatar with Movement Using Kling AI
Now comes the fun part—animating your still avatar image!
Start with making your avatar talk:
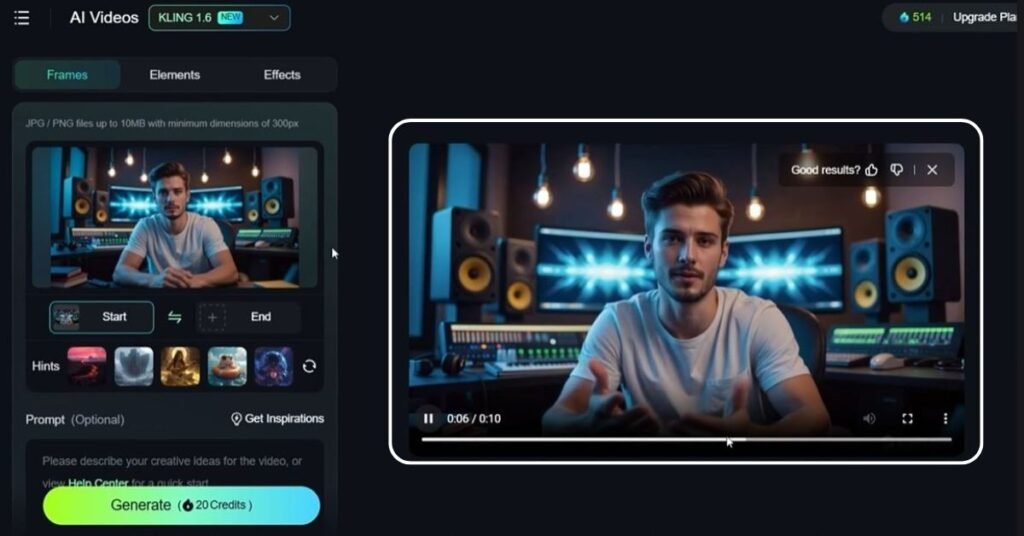
- Open Kling AI and upload your upscaled avatar.
- Input an animation prompt like:
“A static medium close-up shot of a man sitting and talking directly to the camera with a confident and relaxed expression. He makes natural hand gestures as he speaks, moving them gently to emphasize key points. His facial expressions are engaging and dynamic.”
- Add negative prompts to avoid glitches (like robotic movements or weird facial expressions).
Hit Generate, and within seconds, you’ll have an avatar that talks naturally, moves its hands, and maintains eye contact with the camera. Amazing, right?
Step 5: Adding More Dynamic Movements (Standing Up)
A static talking avatar is cool, but an avatar that stands up while talking? Next level.
How to do it:
- Take a screenshot of the last frame from the talking animation.
- Upscale it again in Leonardo AI if needed.
- Upload this frame into Kling AI and use this prompt:
“Tracking shot of a man getting up naturally while still looking at the camera and continuing to talk. He adjusts his posture slightly and gestures with his hands in a relaxed, confident manner.”
Once generated, check the movement. Ensure it transitions smoothly from sitting to standing without glitches. If needed, tweak the prompt and regenerate.
Step 6: Making the Avatar Walk While Talking
This step takes your avatar from static to dynamic storytelling.
How to animate your avatar walking:
- Screenshot the last frame from the standing clip.
- Upload it to Kling AI.
- Use this prompt:
“Tracking shot of a man walking out of the room while talking, looking straight into the camera.”
Hit Generate. Within seconds, your AI avatar is now walking while talking, maintaining smooth eye contact and delivering dialogue like a pro.

Step 7: Generating Voiceovers with 11 Labs AI Voice Generator
An AI avatar needs a human-sounding voice to complete the illusion.
Here’s how to add realistic speech:
- Go to 11 Labs.
- Select Text to Speech.
- Choose a natural-sounding voice.
- Either:
- Generate one full audio file, then cut it during editing.
- OR generate short audio clips for each clip (talking, standing, walking) for easier syncing. I recommend the second option for precise timing.
Step 8: Syncing Voiceovers with Animations
Back in Kling AI:
- Upload your first animation clip (the sitting/talking clip).
- Upload the matching voiceover clip.
- Click Generate to sync the mouth movements.
Repeat the process for:
- The standing clip with its voiceover.
- The walking clip with its voiceover.
You’ll be amazed at how natural and seamless the animations look once the mouth and voice are synced perfectly.
Step 9: Editing the Final Video
Once you’ve got your three animated clips with synced audio, it’s time to edit everything together.
Open your favorite video editor (like Premiere Pro, DaVinci Resolve, or CapCut):
- Import all three clips.
- Trim unnecessary pauses.
- Smooth out transitions between the clips.
- Add background music or sound effects (optional, but it adds polish).
- Adjust color grading or brightness for consistency.
And there you have it! A professional, fully animated AI avatar video ready for YouTube, presentations, or social media.
Step 10: Tips for a More Realistic AI Avatar
Want to take it even further? Here are some expert tips:
- Facial Details: Add slight imperfections for realism (freckles, stubble, wrinkles).
- Background Motion: Subtle movement in the background (like a swaying plant) adds life.
- Lighting Consistency: Match your avatar’s lighting to your video scene.
- Voice Emotion: Use 11 Labs’ emotion settings to match voice tone to your message.
Conclusion
By following this step-by-step guide, you’ve learned how to create a talking AI avatar that not only speaks but stands up and walks, giving your videos a new level of dynamism and professionalism. It’s surprisingly easy when you break it down—generate your avatar, animate it with Kling AI, sync a realistic voice with 11 Labs, and edit it all together seamlessly.
Now it’s your turn! Give it a try and bring your AI avatar to life. If you found this guide helpful, feel free to drop a comment below.
Ready to create your own talking AI avatar? Let’s make it happen!